Battle of Spion Kop
| Battle of Spion Kop | |||||||
|---|---|---|---|---|---|---|---|
| Part of the Second Boer War | |||||||
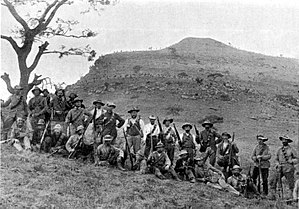 Boers at Spion Kop, 1900. | |||||||
| |||||||
| Belligerents | |||||||
|
|
| ||||||
| Commanders and leaders | |||||||
|
Sir Redvers Buller Charles Warren Edward Woodgate † Neville Lyttelton Alexander Thorneycroft |
Louis Botha Schalk W. Burger Hendrik F. Prinsloo Sr. | ||||||
| Strength | |||||||
|
20,000 36 field guns |
8,000 4 field guns 2 machine guns[1] | ||||||
| Casualties and losses | |||||||
|
243 killed 1,250 wounded[2] |
68 killed 267 wounded[2] | ||||||
Location of Spion Kop within South Africa (modern boundaries) | |||||||
The Battle of Spion Kop (Dutch: Slag bij Spionkop; Afrikaans: Slag van Spioenkop) was a military engagement between British forces and two Boer Republics, the South African Republic and the Orange Free State, during the campaign by the British to relieve the besieged city Ladysmith during the initial months of the Second Boer War. The battle was fought 23–24 January 1900 on the hilltop of Spioen Kop(a), about 38 km (24 mi) west-southwest of Ladysmith and resulted in a Boer victory.
Prelude
[edit]Planning and crossing the Tugela
[edit]General Sir Redvers Buller, VC, commander of the British forces in Natal, was attempting to relieve a British force besieged in Ladysmith. The Boers under General Louis Botha held the Tugela River against him. Although Botha's men were outnumbered, they were mostly equipped with modern Mauser rifles and up-to-date field guns, and had carefully entrenched their positions. In late December, 1899, Buller made a frontal assault on the Boer positions at the Battle of Colenso. The result was a heavy British defeat.[3]
Over the next few weeks, Buller received further reinforcements, and also acquired sufficient carts and transport to operate away from the railway line which was his main supply line. Buller devised a new plan of attack to relieve Ladysmith. His army was to launch a two-pronged offensive designed to cross the Tugela River at two points and create a bridgehead.[4] They would then attack the defensive line that blocked Buller's advance to Ladysmith. The area was only 32 kilometres (20 mi) from Ladysmith. Buller delegated control of his main force to General Sir Charles Warren, to cross at Trichardt's Drift. Buller would then send a second smaller force, under Major-General Neville Lyttelton to attack east of Warren's force as a diversion at Potgieter's Drift. Once across the Tugela, the British would attack the Boer defensive positions and then cross the open plains to relieve Ladysmith.[5]
Warren's force numbered 11,000 infantry, 2,200 cavalry, and 36 field guns. (2nd and 5th Divisions). On the 11th they marched westward to cross the Little Tugela and take up position in front of Potgieter's Ferry.[6] However their march was easily visible to the Boers, and so slow (due in part to the massive baggage trains necessary to British officers at the time – Warren's included a cast-iron bathroom and well-equipped kitchen) that by the time they arrived at the Tugela, the Boers had entrenched a new position covering it. On the 18th, British mounted troops under the Earl of Dundonald enterprisingly reached the extreme Boer right flank, from where there was little to stop them riding to Ladysmith, but Warren recalled them to guard the force's baggage.[7] Once all his force had crossed the river, Warren sent part of the 2nd Division under Lieutenant-General Francis Clery against the Boer right flank positions on a plateau named Tabanyama. The Boers had once again entrenched a new position on the reverse slopes of the plateau, and Clery's attack made no progress. Meanwhile, the secondary British attack by Lyttelton at Potgieter's Drift had yet to commence in full.[8]
Battle
[edit]This section needs additional citations for verification. (January 2018) |
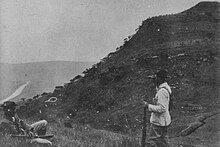
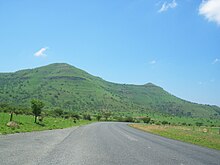
Spion Kop, just northeast of Warren's force, was the largest hill in the region, being over 430 metres (1,410 ft) in height (relative height from its base). It lay almost exactly at the centre of the Boer line. If the British could capture this position and bring artillery to the hill then they would command the flanks of the surrounding Boer positions.[8] On the night of 23 January, Warren sent part of his force, comprising a battalion (eight companies) of the Lancashire Fusiliers under Major-General Blomfield and a mixed battalion (six companies from the Royal Lancaster Regiment and two companies of South Lancashire Regiment) under Major-General Edward Woodgate,[9] to secure Spion Kop. Lieutenant Colonel Alexander Thorneycroft was selected to lead the initial assault. (Thorneycroft was one of six "special service" officers, among who were also Robert Baden-Powell and Herbert Plumer, despatched to South Africa shortly before the war to recruit local irregular corps. Thorneycroft's mounted infantry were raised in Natal and numbered 360.)
The British climbed up the hill at night and in dense mist.[10] They surprised the small Boer piquet and drove them off the kop at bayonet point. Of the 15 men in the Boer piquet, one was mortally wounded and his grave lies on the hill to this day.[11] Ten British soldiers were wounded in the charge.[1] The surviving Boers retreated down the hill to their camp waking up their fellow Boers by screaming "Die Engelse is op die kop!" (The English are on the hill!). A half-company of British sappers began to entrench the position with a mere 20 picks and 20 shovels (while almost 1,000 soldiers stood around idle) and Woodgate notified Warren of the successful capture of the hilltop.[12]
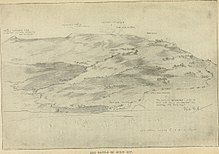
As dawn broke, the British discovered that they held only the smaller and lower part of the hilltop of Spion Kop, while the Boers occupied higher ground on three sides of the British position. The British had no direct knowledge of the topography of the summit and the darkness and fog had compounded the problem. Furthermore, the British trenches were inadequate for all defensive purposes. Because the summit of the kop was mostly hard rock, the trenches were at most 40 centimetres (16 in) deep and provided an exceptionally poor defensive position – the British infantry in the trenches could not see over the crest of the plateau and the Boers were able to fire down the length of the crescent-shaped trench from the adjacent peaks.
The Boer generals were not unduly concerned by the news that the British had taken the kop. They knew that their artillery on Tabanyama could be brought to bear on the British position and that rifle fire could be brought to bear from parts of the kop not yet occupied by the British.[4] However, the Boer generals also knew that sniping and artillery alone would not be sufficient to dislodge the British – and the Boer position was desperately vulnerable. If the British immediately established positions on Conical Hill and Aloe Knoll (the two unoccupied kopjes on the kop itself) they could bring their artillery to bear on Tabanyama, threatening the key Boer positions there. More importantly, there was a risk that the British would storm Trinity Peaks (Drielingkoppe) to the eastern end of Spion Kop. If Twin Peaks fell, the British would be able to turn the Boers' left flank and annihilate the main Boer encampment. The Boer generals realised that Spioen Kop would have to be stormed quickly if certain defeat were to be averted.
-
Kommandant H. F. Prinsloo
-
Lt.Col. A. W. Thorneycroft
-
Maj.Gen. J. Talbot Coke
-
Maj.Gen. E. R. P. Woodgate
The Boer artillery began to bombard the British position, dropping shells from the adjacent plateau of Tabanyama at a rate of ten rounds per minute. Meanwhile, Commandant Hendrik Frederik Prinsloo (1861–1900) of the Carolina Commando captured Aloe Knoll and Conical Hill with some 88 men, while around 300 burghers, mainly of the Pretoria Commando, climbed the kop to frontal assault on the British position. Prinsloo told his men: "Burghers, we're now going in to attack the enemy and we shan't all be coming back. Do your duty and trust in the Lord."[13] Minutes later, hundreds of Boers swarmed in to attack the British positions at the Spion Kop crestline, much to the surprise of the British. It was very unusual for the Boers to launch a daytime massed attack quickly resulting in vicious, close-quarters combat. This was not a custom of the Boers' style of warfare. The British Lee–Metford and Lee–Enfield rifles were no less effective than the Boer Mauser rifles. However, the British excelled in close combat; albeit the surprise of the unusually direct Boer attack likely aided the Boer in the early stages of the engagement. Both sides exchanged fire at close range and engaged in hand-to-hand combat, with the British wielding fixed bayonets and the Boers wielding hunting knives and their own rifles used as bludgeons. After suffering serious losses, the Boer assault carried the crest line after several minutes of brutal hand-to-hand combat, but could advance no further. [citation needed]
Over the next several hours, a kind of stalemate settled over the kop. The Boers had failed to drive the British from the kop, but the surviving men of the Pretoria and Carolina commando now held a firing line on Aloe Knoll from where they could enfilade the British position and the British were now under sustained bombardment from the Boer artillery. The British had failed to exploit their initial success, and the initiative now passed to the Boers. [citation needed]

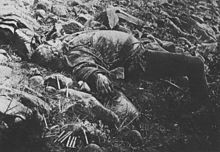
Morale began to sag on both sides as the extreme heat, exhaustion and thirst took hold. On the one hand the Boers on the kop could see large numbers of burghers on the plains below them who refused to join the fight. A sense of betrayal, the bloody failure of the frontal assault, the indiscipline inherent in a civilian army and the apparent security of the British position proved too much for some Boers, who began to abandon their hard-won positions. On the other hand, the bombardment began to take its toll on the British. Woodgate fell at about 08:30, mortally wounded by a shell splinter.[1] In quick succession, Colonel Blomfield of the Lancashire Fusiliers took command but was wounded soon after Woodgate's death, while the sappers' officer, Major H.H.Massy, and Woodgate's brigade major, Captain N.H. Vertue, were killed.[14] Officers and men from different units were intermingled, and the British were now leaderless, confused and pinned down by the heavy Boer artillery and rifle fire. The British artillery, positioned lower down the slopes of Spion Kop, were unable to hit back at the Boer guns.[1] The British artillery was also missing their marks, causing one soldier to remark in his diary of the events "our gunners, by the inaccuracy of their fire did far more damage to our front line of infantry than to the Boers!"[15]
Colonel Malby Crofton of the Royal Lancasters took charge and semaphored a plea for help, "Reinforce at once or all is lost. General dead."[16] After that the stunned colonel failed to exercise any leadership. Thorneycroft seems to have taken charge, leading a spirited counterattack that failed in the face of withering fire.
Warren had already dispatched Major-General John Talbot Coke's brigade of two regular battalions and the Imperial Light Infantry (raised in Durban) to reinforce the summit. However, he refused to launch an attack on Tabanyama and barred his guns from firing on Aloe Knoll, believing this to be part of the British position. At 11:40, Buller, who could see that things were not going well, suggested to Warren that Thorneycroft be appointed commander on the kop. The first runner to Thorneycroft was shot dead before he could utter a word. Finally, a second runner brought the news, "You are a general."[17]
Winston Churchill was a journalist stationed in South Africa and had been commissioned as a lieutenant in the South African Light Horse by General Buller after his well-publicised escape from Boer captivity. Churchill acted as a courier to and from Spion Kop and Buller's headquarters and made a statement about the scene: "Corpses lay here and there. Many of the wounds were of a horrible nature. The splinters and fragments of the shells had torn and mutilated them. The shallow trenches were choked with dead and wounded."
About 13:00, the situation proved too much for some men of the Lancashire Fusiliers who attempted to surrender. Thorneycroft personally intervened and shouted at the Boers who advanced to round up prisoners, "I'm the commandant here; take your men back to hell sir. I allow no surrenders."[17] Fortunately for Thorneycroft, the first of the British reinforcements arrived at this moment. A vicious point-blank firefight ensued but the British line had been saved. At 14:30, Thorneycroft sent Warren a plea for reinforcements and water. Meanwhile, Coke never reached the summit. He saw Thorneycroft's message for help but then did nothing to assure the lieutenant colonel of his nearby presence or support.
The Middlesex Regiment and the Imperial Light Infantry, under Colonel Augustus Hill, who was senior to Thorneycroft in the army list and who also believed he was overall commander on the kop, held the British right for two and a half hours until a second crisis occurred when they too began to give way. The Cameronians (Scottish Rifles) arrived at this point, and drove the Boers back with a bayonet charge. The fighting on the British right now became a stalemate.[18]
In the morning, Warren had asked for reinforcements from Lyttelton's division, even though he had eleven battalions of his own to draw upon. Without asking Buller, Lyttelton sent two battalions toward Spion Kop. One battalion, the King's Royal Rifle Corps, turned aside to attack Twin Peaks. After losing Lieutenant Colonel Riddell killed and 100 other casualties, the rifles cracked the thin Boer line and carried the double summit at 17:00.[1]
Aftermath
[edit]
Shattered by the loss of Twin Peaks, General Schalk Willem Burger took his commando out of the battle line that night. On Spion Kop, the Boers who had fought bravely since morning abandoned their positions as darkness fell. They were about to retreat, when Botha appeared and persuaded them to stay. The Boers, however, did not reclaim their positions, and unknown to Thorneycroft, the battle was as good as won. But Thorneycroft's nerve was also shattered. After sixteen hours on the kop doing the job of a brigadier-general in total absence of instructions from Warren, he ordered an unauthorised withdrawal from Spioen Kop after reporting that the soldiers had no water and ammunition was running short.[1] His reasons for withdrawing were that without artillery support to counter the heavy Boer artillery fire, there was no possibility of defending the position and the extreme difficulty of digging trenches on the summit of Spion Kop left the British soldiers completely exposed.[1] Churchill appeared on the scene for the second time.[1] This time he brought the first orders from Warren since he elevated Thorneycroft to brigadier. Churchill said 1,400 men were on the way with two large naval guns. Thorneycroft told him, "better six good battalions safely down the hill than a bloody mop-up in the morning."[19] He ordered the brigade to retreat.
At the same time, Buller sent Lyttelton strict orders to recall his troops from Twin Peaks.
When morning came, the Boer generals were astonished to see two burghers on the top of Spion Kop, waving their slouch-hats in triumph. The only British on the kop were the dead and the dying.
The British suffered 243 fatalities during the battle; many were buried in the trenches where they fell. Approximately 1,250 British were either wounded or captured. Mohandas Gandhi was a stretcher-bearer at the battle, in the Indian Ambulance Corps he had organised, and was decorated. The Boers suffered 335 casualties of which 68 were dead, including Commandant Prinsloo's commando casualties of 55 killed and wounded out of 88 men.
The British retreated back over the Tugela, but the Boers were too exhausted to pursue and follow up their success. Once across the river, Buller managed to rally his troops. Ladysmith would be relieved by the British four weeks later.
Reaction and legacy
[edit]The battle was the background for Louwrens Penning's best known novel De held van Spionkop (1901, The Hero of Spionkop).[20][21] Penning's story concerns the very real Commandant Louis Wessels,[22][23] who leads the Boer commando to defeat the British at the battle.[24]
Commentary
[edit]Buller erred in appointing Warren an independent commander, despite his own doubts about his subordinate's capacity.[25] On the evening of the battle, Warren only ordered up reinforcements in men and heavy guns at the late hour of 21:00. Medical assistance, water and ammunition were also tardy in arriving.
"Still, perhaps it was not Warren's failure to remedy these deficiencies that proved his worst error. It was his failure to tell Thorneycroft of his plans to do so. Astonishing as it may seem, he had sent no direct instructions to Thorneycroft since the heliogram appointing him a general at midday. He had left it to Coke to reassure Thorneycroft, although (by another astonishing blunder) Warren had never actually told Coke that he had put Thorneycroft in charge. Then, to compound all these blunders, at 9:00 pm Warren had ordered Coke to return to the HQ for consultation, leaving Thorneycroft alone among the horrors on the summit."[26]
Note about the name
[edit]The common English name for the battle is Spion Kop throughout the Commonwealth and its historical literature, the official South African English and Afrikaans name for the battle is Spioenkop: spioen means 'spy' or 'look-out', and kop means 'hill' or 'outcropping'. Another variant that is sometimes found is the combination into Spioenkop.
The reason why the older spelling is used internationally is because the name Spioenkop originates from Dutch; Spion [spee-yawn], and not spioen [spee-yoon], is the Dutch word for 'spy'. Until the 1920s, Dutch was still the official written language of the Boers, which is why the older Dutch spelling persists outside South Africa. Within South Africa, the spelling was updated along with Afrikaans spelling reform and recognition of Afrikaans as a language in its own right.
Legacy of the name
[edit]
- Many football grounds in England in the Premier League and Football League have one terrace or stand in their stadia named "Kop" or "Spion Kop" because of the steep nature of the terracing. For a history and list of these, see Spion Kop (stadiums).
- The village of Spion Kop near Mansfield, Nottinghamshire was named after the battle.
- A hill outside Llanwrtyd Wells, Powys is called Spion Kop, in memory of the battle.
- Several golf courses have holes named after Spion Kop. In Scotland this includes the 5th hole at Craigie Hill Golf Club,[citation needed] the 16th hole at Edzell golf course,[citation needed] the 5th hole at Strathtay golf course,[27] and the 2nd hole at Traigh golf course.[citation needed] In Australia this includes the 4th hole at East Geelong Golf Club and the 13th hole of the Launceston Golf Club. The 7th hole of the Centenary Course at the Royal Sydney Golf Club was also occasionally known by the name, although this usage has fallen away. [citation needed] In New Zealand there is the 18th hole at Otago Golf Club.[28]
- Daleview cottages, in the village of Ballybrack, in Co. Dublin, Ireland, were known locally as "The Kop". They were built around 1900 and are on a steep hill.
- The higher part of Wivenhoe, Essex, England, is known as Spion Kop, possibly because veterans of the Boer war once lived on Manor road.
- There is a bungalow at Dungeness, Kent called Spion Kop and is very distinctive as it has a tall tower attached which was used to 'spy on' passing channel traffic for Trinity House and to 'Kop' any possible salvage opportunities as there were many wrecks and beachings along this Kent coast line. It was operated by the enterprising Bates family for several generations and were also responsible for much housing development of the area along the coast towards Greatstone and Littlestone. ref The Bates family
- A cemetery on the coast in Hartlepool is named Spion Kop Cemetery.
- A row of cottages in Belfield, Greater Manchester are named Spion Cop and dated 1900
- Spion Kop is the name of a small street in the town of Ashton-in-Makerfield (Wigan District, Greater Manchester, UK)
- Two cottages in Watledge, Gloucestershire, are named Spion Kop and dated 1901.
- There is a hill in Paracombe, South Australia named Spionkop, approximately 400 metres high
- A locality forming part of the town of Kurri Kurri NSW in Australia has the name Spion Kop
- A junction in the West Melbourne railyards is called Spion Kop.[29]
- The South African Navy Valour-class frigate SAS Spioenkop (F147) is named after the battle.
- A steep rocky outcrop on the north beach of Arklow, Ireland, is known as Spion Kop. It acquired this name as the land was part of the Kynoch's armaments and explosives factory, who supplied munitions for the Boer War. It inspired the poem "Spion Kop" by poet Toddy Kennedy.[30]
- A mountain top east of Narvik, Norway, was named Spionkopen after news of the battle reached the navvies constructing the nearby Ofoten railway line.
- In Whitby, a rocky outcrop created by the cutting of Kyber Pass is called Spion Kop.[31][32]
- There is a named area in Judith Basin, Montana called Spion Kop. A post office was established there in 1906.
- A residential street in Selkirk, Scottish Borders is called Spion Kop.
- A hill in Queenstown, Tasmania is called Spion Kopf.[33]
- A hill that housed a fire control position as part of the York Redoubt fortifications outside of Halifax, Nova Scotia was called Spion Kop due to how much it resembled the hilltop.
- A mountain to the north of Kelowna, British Columbia is called Spion Kop (Sometimes Spioen Kopje). It is often described as a rocky outcropping that overlooks the central Okanagan Valley.
- A small Wood near the village of Six Mile Bottom in Cambridgeshire, England is called Spion Kop (52.18374, 0.33244).
- A variety of fuchsia has been named after the battle.[34]
- The disused Spion Kop Quarry in Gloucestershire is named after the battle.[35]
In popular culture
[edit]The Iceman Cometh by Eugen O'Neil, Act One: "WETJOEN--(grins) Gott! To dink, ten better Limey officers, at least, I shoot clean in the mittle of forehead at Spion Kop, and you I miss! I neffer forgive myself! (Jimmy Tomorrow blinks benignantly from one to the other with a gentle drunken smile.)"[36]
See also
[edit]References
[edit]- ^ a b c d e f g h Thorneycroft, Alexander (1999). The Stationery Office (ed.). The Boer War, Ladysmith and Mafeking, 1900. Uncovered Editions (Abridged ed.). Guildford, Surrey: Biddles Limited. ISBN 0-11-702408-2.
- ^ a b "The Battle of Spion Kop". British Battles. Archived from the original on 25 May 2008. Retrieved 31 May 2008.
- ^ Dupuy, p. 854
- ^ a b Thomas Pakenham, The Boer War, pp. 281–283
- ^ General Buller's despatches
- ^ Churchill, "London to Ladysmith via Pretoria", Chapter XV
- ^ Kruger, p. 183
- ^ a b Thomas Pakenham, The Boer War, p. 284
- ^ Arthur Conan Doyle (1902) The Great Boer War, Ch XV. ISBN 1-4043-0473-8
- ^ Thomas Pakenham, The Boer War, p. 286
- ^ E. Woodgate (letter to C.Warren, 24 January 1900) from Uncovered Editions.
- ^ Thomas Pakenham, The Boer War, p. 288
- ^ Pakenham, p. 303
- ^ Pakenham, p. 307
- ^ Shaw, Jocelyn (1932). Twenty Two Years of Soldiering in Peace and War.
- ^ Pakenham, pp. 308–309
- ^ a b Pakenham, p. 312
- ^ Kruger, Goodbye Dolly Grey, pp. 193–194
- ^ Pakenham, p 319
- ^ Den Held van Spionkop Louwrens Penning (1927) at DBNL
- ^ Den Held van Spionkop Louwrens Penning (1927) at De Boekenkamer
- ^ George McCall Theal History of South Africa Since September 1795 ISBN 1108023665. 2010, p. 206 "The camp of Commandant Louis Wessels was at this time at Berea. Molapo had requested that he might be permitted to communicate with his father, and General Fick agreed to send his messengers to the camp at Berea at the same time that ..."
- ^ Michael G. Bergen Storm over South Africa. p. 194 ISBN 164069580X. 2017. "... same day, a young officer named Louis Wessels arrived with a hard-bitten crew of fifty men, with whom he had been operating in the field for over a year. He reported British columns closing in on them from the rear, and said that unless they ..."
- ^ Elmar Lehmann, Erhard Reckwitz. Mfecane to Boer War: versions of South African history . 1992. "His most celebrated novel was De Held van Spionkop, which many a Dutchmen can recall with nostalgia even to this very day. The main character is the Boer Louis Wessels, who flits in and out of the novel like some superman." [ISBN missing]
- ^ Symonds, Julian (1963). Buller's Campaign. London: The Cresset Press. p. 241.
- ^ Pakenham, p 318
- ^ "Scorecard – Golf Course in Perthshire". Strathtay Golf Club. Retrieved 27 February 2024.
- ^ "Course hole details – Otago Golf Club". www.otagogolfclub.co.nz. Retrieved 27 February 2024.
- ^ Gerald A. Dee, "A Lifetime of Railway Photography", in Photographer Profile Series, Studfield, 1998, p. 20
- ^ "Toddy Kennedy: A Portrait of the Artist" Eric Farrell 16 March 2014, Wicklow News
- ^ Welcome to Whitby 11 January 2021 on Facebook
- ^ Whitby from Spion Kop James Valentine Photographic Collection at University of St Andrews
- ^ "Queenstown Spion Kopf Lookout | Things to Do | Experience Tasmania". Tasmania. Retrieved 27 February 2024.
- ^ "Fuchsia 'Spion Kop' (d)". Royal Horticultural Society. Archived from the original on 27 August 2022. Retrieved 27 August 2022.
- ^ Wilson, John (1997). Wye Valley (3rd ed.). Climbers Club. ISBN 978-0901601605.
- ^ "The Iceman Cometh". gutenberg.net.au. Retrieved 11 January 2025.
Bibliography
[edit]- The 7 volume "The Times History of the War in South Africa", ed L.S. Amery, (pub 1900–1909)
- Castle, H.G. (1976). Spion Kop: The Second Boer War. London: Almark. ISBN 0-85524-251-5.
- Churchill, Winston My Early Life. New York: Simon & Schuster, 1930.
- Defender (1902). Sir Charles Warren and Spion Kop: A Vindication. London: Smith, Elder.
- Dupuy, R. E; Dupuy, T. N. (1977). The Encyclopedia of Military History. New York: Harper & Row. ISBN 0-06-011139-9.
- Doyle, Arthur Conan (1902). The Great Boer War. IndyPublish.com. ISBN 1-4043-0473-8.
- Farwell, Byron, The Great Anglo-Boer War. New York: Harper & Row 1976.
- Judd, Dennis. (2003) The Boer War. New York: MacMillan. [ISBN missing]
- Knight, Ian. (1995) Colenso 1899: The Boer War in Natal. Osprey Campaign Series #38; Osprey Publishing ISBN 1-85532-466-0
- Kruger, Rayne. (1964) Goodbye Dolly Gray, New English Library.
- Pakenham, Thomas. (1979) The Boer War. New York: Random House.
- Oliver Ransford (1971). Battle of Spion Kop. London: John Murray. ISBN 9780719519147.
- Reitz, Deneys (1929). Commando: A Boer Journal of the Boer War. Faber. ISBN 0-571-08778-7. Archived from the original on 24 December 2004. Retrieved 22 December 2004.
- An Illustrated History of South Africa, Cameron & Spies, Human & Rousseau publishers, 1986. (ISBN 1-86812-190-9).
- Herman T. Voelkner, (Article title needed) Military Heritage, October 2005, Volume 7, No. 2, pp 28–35, 71), ISSN 1524-8666.
- Mackay, Don (2012). The Troopers Tale:The History of the Otago Mounted Rifles. Dunedin: Turnbull Ross. ISBN 978-0-473-20462-4.
- Manchester, William, The Last Lion. Boston: Little Brown, 1983. [ISBN missing]
- Sandys, Celida. Churchill: Wanted Dead or Alive. New York: Carroll and Graf, 1999. [ISBN missing]
External links
[edit]- Personal reflections on a trip to Spioen Kop Extensive page on the battle with dozens of photos
- BBC Sport – page containing a video which, although about the football stand called the Kop, goes through in detail the Spioen Kop battle
- Despatches in the London Gazette original reports from the commanding officers.


